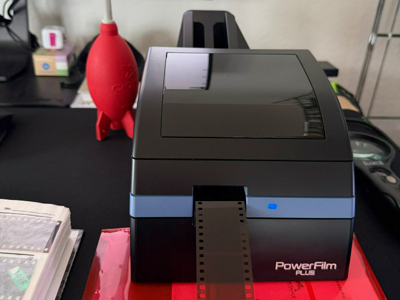
Der Pacific Image PowerFilm Plus ist ein Scanner für 35mm/135 Filmstreifen. Für mich ist sein grösster Vorteil: Er verarbeitet ganze Filmstreifen (ähnlich vom Konzept her wie ein Nikon Coolscan mit Streifen-Adapter), hat einen USB-Anschluss und liefert dabei gute Ergebnisse – und das mit einem Workflow, der sich gut in moderne Setups integrieren lässt.
Produktlink: PowerFilm Plus bei Amazon ansehen
Die grössten Vorteile (für meinen Einsatz)
• Streifenverarbeitung wie beim Coolscan-Prinzip: ganze Filmstreifen statt nur Einzelbilder.
• USB-Anschluss: unkompliziert am aktuellen Rechner nutzbar.
• Gute Ergebnisse: für mich klar überzeugend – auch im Vergleich zu älteren Setups.
• Praktischer Durchsatz: schnell genug, um grössere Mengen Film entspannt zu digitalisieren.
Software: VueScan statt Hersteller-Software
Ich verwende VueScan, weil mir die mitgelieferte Software nicht gefällt. Mit VueScan bekomme ich einen Workflow, der für mich besser passt: saubere Bedienung, stabile Ergebnisse und die Möglichkeit, bewusst neutral zu scannen.
Neutral scannen (mein Ansatz): Ich scanne die Filme mit neutralen Settings in VueScan – ohne starke Auto-Korrekturen. Den „Look" (Tonwerte, Farbe, Charakter) mache ich später in der Nachbearbeitung.
Wichtig zu wissen: Ganzer Streifen als ein „Bild"
Der PowerFilm Plus scannt einen kompletten Filmstreifen als eine einzige Datei. Das ist für mich ein Pluspunkt, weil der Scan-Schritt dadurch sehr geradlinig ist.
Frame-Erkennung & Export als Multi-TIFF: VueScan kann die einzelnen Bilder (Frames) automatisch erkennen. Mein Ablauf: Streifen scannen (neutral in VueScan) → VueScan erkennt die Frames automatisch → Export als Multi-TIFF (mehrseitige TIFF-Datei) mit allen Frames.
Multi-TIFF aufteilen: Das mache ich mit TIFF Splitter 4.0. Damit zerlege ich die Multi-TIFF-Datei in einzelne Bilddateien und kann anschliessend sauber benennen und archivieren.
Batch-Scanning: In der Theorie super – in der Praxis klebt Film manchmal
Offiziell ist Stapelverarbeitung möglich – in der Praxis funktioniert das aber nur dann zuverlässig, wenn alle Streifen perfekt eingelegt sind und wirklich sauber sind. Ein typischer Stolperstein: Wenn Filmstreifen minimal zusammenkleben (z. B. durch Lagerung oder statische Effekte), können zwei Streifen zusammen eingezogen werden. Daher scanne ich die Streifen nacheinander – verlässlicher und trotzdem schnell genug.
Nachbearbeitung: Topaz Photo (Batch ist extrem praktisch)
Für die Nachbearbeitung nutze ich Topaz Photo. Besonders praktisch ist der Batch-Betrieb: Wenn die Scans einmal gesplittet sind, kann ich viele Bilder in einem Rutsch verarbeiten.
Mein Workflow (kurz & reproduzierbar)
1. Reinigung (Blasebalg + antistatischer Pinsel).
2. Einlegen: immer nur einen Streifen, sauber ausgerichtet.
3. Scan in VueScan (neutral).
4. Export als Multi-TIFF (Frames automatisch erkannt).
5. Split mit TIFF Splitter 4.0.
6. Batch-Nachbearbeitung in Topaz Photo.
7. Finaler Export (Archiv + Web/Print, je nach Bedarf).
Fazit
Der grösste Vorteil des PowerFilm Plus ist für mich die Kombination aus Streifenverarbeitung wie beim Coolscan-Prinzip, USB-Anschluss und guten Ergebnissen. In Verbindung mit VueScan (neutral), Multi-TIFF + TIFF Splitter 4.0 und Topaz Photo (Batch) ergibt sich ein Workflow, der schnell, modern und sehr gut beherrschbar ist.
—
The Pacific Image PowerFilm Plus is a scanner for 35mm/135 film strips. For me, its biggest advantage is that it processes entire film strips (similar in concept to a Nikon Coolscan with strip adapter), has a USB connection, and delivers good results – all with a workflow that integrates well into modern setups.
Key advantages (for my use)
• Strip processing like the Coolscan concept: entire film strips, not just single frames.
• USB connection: works easily with any current computer.
• Good results: clearly convincing for me – even compared to older setups.
• Practical throughput: fast enough to digitise larger amounts of film in a relaxed way.
Software: VueScan instead of manufacturer software
I use VueScan because I don't like the bundled software. VueScan gives me a workflow that suits me better: clean operation, stable results, and the ability to scan deliberately neutral.
Neutral scanning (my approach): I scan films with neutral settings in VueScan – no heavy auto-corrections. The "look" (tonal values, colour, character) is handled later in post-processing.
Important to know: The scanner scans an entire strip as one "image"
The PowerFilm Plus scans an entire film strip as a single file. That's a plus for me because the scanning step is very straightforward.
Frame detection & Multi-TIFF export: VueScan can automatically detect individual frames. My process: scan the strip (neutral in VueScan) → VueScan detects frames automatically → export as Multi-TIFF (multi-page TIFF file) containing all frames.
Splitting the Multi-TIFF: I do this with TIFF Splitter 4.0, which breaks the Multi-TIFF into individual image files that I can then name and archive properly.
Batch scanning: Great in theory – but film sometimes sticks in practice
Officially, batch processing is supported – but in practice it only works reliably when all strips are perfectly loaded and truly clean. A typical pitfall: when film strips stick together slightly (e.g. from storage or static effects), two strips can be pulled in together. So I scan strips one at a time – more reliable and still fast enough.
Post-processing: Topaz Photo (batch mode is extremely practical)
For post-processing I use Topaz Photo. The batch mode is particularly practical: once the scans are split, I can process many images in one go.
My workflow (short & reproducible)
1. Cleaning (blower + anti-static brush).
2. Loading: always just one strip, properly aligned.
3. Scan in VueScan (neutral).
4. Export as Multi-TIFF (frames auto-detected).
5. Split with TIFF Splitter 4.0.
6. Batch post-processing in Topaz Photo.
7. Final export (archive + web/print as needed).
Conclusion
The biggest advantage of the PowerFilm Plus for me is the combination of strip processing like the Coolscan concept, USB connection, and good results. Together with VueScan (neutral), Multi-TIFF + TIFF Splitter 4.0, and Topaz Photo (batch), the result is a workflow that is fast, modern, and very manageable.
Transparenz-Hinweis / Disclosure: Wenn du Links zu Shops nutzt, kann das (je nach Programm) ein Affiliate-Link sein. Für dich ändert sich am Preis nichts. / Shop links may be affiliate links. The price remains the same for you.
Archivfreundlich: statisches HTML, keine Cookies, kein Tracking.
© Frank Meiners · frank-meiners.de